

Product Details
DHP Jenny Lind Bed, Pink, Twin
Free Shipping+Easy returns

Product Details
Storkcraft Caribou Solid Hardwood Twin Bunk Bed, Gray Twin Bunk Beds for Kids with Ladder and Safety Rail
Free Shipping+Easy returns

Product Details
Storkcraft Long Horn Solid Hardwood Twin Bunk Bed, White Twin Bunk Beds for Kids with Ladder and Safety Rail
Free Shipping+Easy returns

Product Details
Giantex Writing Desk with 4 Drawers, Removable Floating Organizer 2-Tier Mission Home Computer Vanity Desk for Apartment Small Space, White
Free Shipping+Easy returns
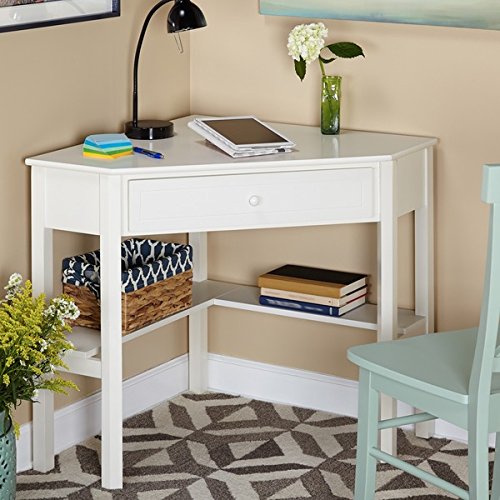
Product Details
This Classically Styled Desk utilizes a Small Space for a Big Impact, with Stylish Under-Desk Shelving and a Drawer to Hide Clutter. Simple Living Wood Corner Computer Desk (1, Antique White)
Free Shipping+Easy returns

Product Details
DaVinci Piper Upholstered Recliner and Swivel Glider, Cream
Free Shipping+Easy returns

Product Details
Max & Lily Solid Wood Twin over Twin Bunk Bed, White
Free Shipping+Easy returns
Vintage Jenny Lind wooden high chair

Baby girl furniture

This vintage high chair is in great condition When I got it it needed 2 screws The legs have a few stress cracks Barely noticeable Very very sturdy I painted it with Pink chalk paint Distressed it lightly And sealed it with a matte topcoat for durability No VOC’s I mad
e a new strap for it! Put pads on the bottom This chair would be a perfect Chair for someone who does photos Or a little girls high chair 40” high 21” width on legs 20” deep on legs Tray is 19” wide
Vintage High Chair

Jenny Lind high chair makeover project

Last year I was able to find an original highly coveted Jenny Lind high chair from the 80s. After seven months of searching I was so excited to find one a town over from where I live. Especially because the guy just had no clue as to why a woman was offering him $50 for it after I had already claimed it (for $25). Alas it had sat dusty in my garage waiting to be loved ever since that day I bought it super pregnant. Since Presley will be starting on solids when she hits the 6 months mark (tomorrow!). It was due time to get my husband started on this project. I tried to take photos of the process to share but feel free to ask any questions if I missed a step! Here is the original in all her dusty glory. First David removed all the hardware. We thought about changing it to make it easier to pop the tray off. However I felt if there ever comes a day if we want to sell it I wanted it all original. So we kept everything the same. Next step was to wipe the highchair down with water to remove dust and dirt. After the initial bath David than lightly sanded any slight imperfections. He used 320 grit sandpaper. After the chair was sanded he washed it again with water and used TSP to give it an extra good cleaning. Once this was complete he allowed the highchair to dry overnight in a well ventilated area. Once the chair had completely dried he disassembled it to make the painting process easier and more through. He then used painters tape where the wood connected so he could wood glue it back together in addition to the screws. David uses an air compressor to paint most of our furniture. His technique is so awesome you would swear all our pieces are store bought. For the project it was important to me to use a no VOC paint since Presley would be eating directly off the tray. For this project we used Valspar Optimus Interior Paint. This is a low-odor, no VOC paint. We will be applying some sort of seal or wax to the paint to prevent staining but this stage hasn’t been completed yet. After David had finished painting it was now time to remove the painters tape and reassemble. Notice in the above photo there is tape painted over. This is where the foot board goes. He marked the spots to adhere wood glue and screw it back on. Once he removed the tape he placed wood glue on the foot board to secure it. Looks pretty good without the tray too! Wood glue and original screws are used to make the chair extra secure. And here she is in all her newfound glory! I just love the way it turned out and I cannot wait for little miss P to have her first smash cake in it in six short months!
Swing tray wooden highchair vintage antique

Vintage High Chair

This listing is for a painted white antique high chair. This high chair is awesome. Professionally painted AND a brand new matching white waist belt AND a brand new leather tray to base belt. This would make for a sturdy and perfect everyday high chair. This gorgeous high chair would also make a great piece for pictures or decoration. You will not be dissatisfied with your purchase. Message me for a more accurate price for shipping. I will deliver in local areas to Burlington, NC for a reasonable cost (Greensboro, Raleigh, Durham, Charlotte) Please check out my selection of vintage high chairs if you desire another style of chair: https://www.etsy.com/shop/TheKristKorner?ref=seller-platform-mcnav§ion_id=17165929
Baby Stuff

Last year I was able to find an original highly coveted Jenny Lind high chair from the 80s. After seven months of searching I was so excited to find one a town over from where I live. Especially because the guy just had no clue as to why a woman was offering him $50 for it after I had already claimed it (for $25). Alas it had sat dusty in my garage waiting to be loved ever since that day I bought it super pregnant. Since Presley will be starting on solids when she hits the 6 months mark (tomorrow!). It was due time to get my husband started on this project. I tried to take photos of the process to share but feel free to ask any questions if I missed a step! Here is the original in all her dusty glory. First David removed all the hardware. We thought about changing it to make it easier to pop the tray off. However I felt if there ever comes a day if we want to sell it I wanted it all original. So we kept everything the same. Next step was to wipe the highchair down with water to remove dust and dirt. After the initial bath David than lightly sanded any slight imperfections. He used 320 grit sandpaper. After the chair was sanded he washed it again with water and used TSP to give it an extra good cleaning. Once this was complete he allowed the highchair to dry overnight in a well ventilated area. Once the chair had completely dried he disassembled it to make the painting process easier and more through. He then used painters tape where the wood connected so he could wood glue it back together in addition to the screws. David uses an air compressor to paint most of our furniture. His technique is so awesome you would swear all our pieces are store bought. For the project it was important to me to use a no VOC paint since Presley would be eating directly off the tray. For this project we used Valspar Optimus Interior Paint. This is a low-odor, no VOC paint. We will be applying some sort of seal or wax to the paint to prevent staining but this stage hasn’t been completed yet. After David had finished painting it was now time to remove the painters tape and reassemble. Notice in the above photo there is tape painted over. This is where the foot board goes. He marked the spots to adhere wood glue and screw it back on. Once he removed the tape he placed wood glue on the foot board to secure it. Looks pretty good without the tray too! Wood glue and original screws are used to make the chair extra secure. And here she is in all her newfound glory! I just love the way it turned out and I cannot wait for little miss P to have her first smash cake in it in six short months!